Saturday, August 23, 2008

Pool Parties, Weddings, and BBQ's

Here's a little sampling from some of the parties I have been doing lately. Lotsa parties... lotsa caricatures.


Just did this one last night. Great time with great people.

Tuesday, August 5, 2008

Birthday Party Caricatures, in COLOR!


This is a little sampling from a birthday party last week. It's been a little while since I have drawn in color at a party. It felt great to bust out those color sticks again.

August is going to be a crazy busy month. I have a good amount of gigs booked for the upcoming weekends. So I will be sure to bring my camera along to document.

For all of those who don't know, I got a new email address: colinharrisart@gmail.com

I recently purchased a Blackberry so I can check my emails when I am on the road. Trying to learn how to I can update my blog from the phone also. Look for some of that in the future.

Monday, July 21, 2008

Funny Lookin' Kids

The updates on my blog have been a lot less frequent lately. Sorry to anyone who checks this once in while. All three of you... So, after talking to Emily Anthony today, I realized I have neglected it a little lately.

So here is an update... I just got home from work, did the dishes, answered some emails... but I think people wanna see drawings. So, it is time now to post some from some recent parties. This one kind of has a theme if you notice.


These made me laugh. The kids also laughed. That's always a good sign.

I will make an effort to post more frequently. I promise! Stay Making!!!!

Sunday, July 6, 2008

Big Update

It is finally time for another update! I have been ridiculously busy lately. Although, somehow I managed to fit a few gigs in here and there. As things slow down a little I hope to keep working on my new website as well as updating this page more often.

This first group of photos is from a few weeks ago at an 8th grade graduation party. They set up this amazing booth for me. The walls were made of soft velcro. When I completed a drawing, I would place a piece of the coarse velcro tape on the back of the drawing and get up to place it on the wall. It worked really both functionally and aesthetically. The real advantage was the kids could view all of the completed caricatures and laugh at eachother.


Mahhooot!


The final wall.


Now that's what I like to see.


From a company picnic out somewhere in Jersey.


I guess this guy really liked geckos. At another company picnic.


I had fun with this drawing The day before this I bought an Xbox 360 myself. I also liked how his posture turned out.


Smirnoff promotion. Hence the bottles of liquor in their hands.


This is a commision for a co-worker. She wanted to give it to her son as a gift for his birthday. I did it with prismacolor markers. I think he looks just like Andrew WK.

Sunday, June 8, 2008

Some Weekend Drawin's

Here's some from a couple gigs over the weekend. This first one was an employee appreciation party. It was a carnival theme and I was placed drawing right next to some massage therapists. I told them that I tried to make people relax too from the smell of my markers.


Hi Colin,

I just wanted to shoot you a quick email thanking you again for coming to our event last night. You were a huge hit! Thanks for staying a little late, that was so unnecessary and greatly appreciated! I am sure we will be looking to use you again in the future! Thanks.


The next day my good friend Matt Zitman and I ventured out at 11pm to draw at a post prom until 3am. Thank God for energy drinks. There were a countless number of teenagers and everyone wanted a drawing. Kept all the drawings black and white for the sake of time.


The famous Zitman. In college he pressured me to become a caricature artist and I refused. He got my roomate to start drawing at Sesame Place and the summer after I caved in and joined him. Zitman taught me a lot from just watching him draw and working with him at Six Flags last summer. He is one of the best caricature artists I have ever seen and also a really awesome guy. Check out the link to his blog.


Last drawing of the night... we both gave a shot at really quick sketches. Every caricature artist sees something different in someone.

Friday, May 23, 2008

Live Caricatures


One from a horse racing BBQ.


The two kids on the end are sitting opposite of the way they were drawn.


Set up last weekend at a fair in Newtown,PA, my hometown. This was the third year I set up a tent. It is always a great time cause I get to hang out with my parents and eat good food with other good people. It was nice and busy with a lot of people getting drawings. That is until the rain started and never stopped. I had to take down the tent and retreat. Thanks Dad for your help. In return here is a gross looking drawing. Happy Belated Birthday!

It was all worth it. Too bad us caricature artists have no luck in the rain. The paper gets soggy and is really difficult to draw on. And forget about using the color sticks. I've had them rip right through the paper in the middle of drawing. That was when I did my time at Sesame Place. I've got a lot more events coming up. Busy, busy, busy. Will try and update more frequently.

Wednesday, May 14, 2008

Trader Joe's Caricature Sign


Made this new sign for Trader Joe's. This is Bud, he just celebrated his 80th birthday. My gift to him was to have his caricature on permanent display in our store. Happy birthday Bud. I guess you could call him the "Budler", get it? I had a great time making this one. Wanna do more of this in the future. I should have a pretty large "On the Helm" update coming soon. Lotsa signs are being made!

Two posts in one day! Call me "Hoagie" cuz I'm on a roll.

Caricature from Photograph


Just a quick post this morning before work. I made this a few days ago as a gift for my parents neighbors. Made it from a couple different photographs, but here is one. Don't you want one too???

Friday, May 9, 2008

Caricature Couple

This past weekend I had a couple events. I didn't take too many photographs, but I managed to get this one.


I like the way his head turned out. He had a great smile that lifted his entire face upwards. He is only about halfway there in this photo.

Lots of events coming up this month. A couple post proms, a couple of art fairs, and of course more sign making madness at Trader Joe's. I've got a big update of those coming in the near future. Good thing I am done making that bike. Now I will have more free time. Oh and of course, my website! It is coming I swear!

Fixed Gear Bike

It's getting nice outside, and you know what that means... bike rides! I don't use my car much anymore. I mostly only drive to caricature gigs. I needed a sweet bike to ride to work, so I decided to build myself a fixed gear. It took some researching online about how to actually rebuild a bike into a fixed gear. I have never attempted building a bike. My only knowledge to this point was changing an occasional bike seat or flat tire.

I found a nice used bike at a bike shop in Philly called Firehouse Bicycles. It fit me real nice and was lightweight, just needed some love. A Raleigh Technium, with an aluminum frame. it came with beautiful shades of red, white, blue, and rust, not really my steez.


So I took it all apart, not really knowing how to get it back together again.


Sanded down the rust and clear coating, then starting spraypainting. My neighbor Brian hung out on the porch with Martha and I. That was a good day.


Some primer.


Decided to go with black. A couple coats and some clear coats on top of that.
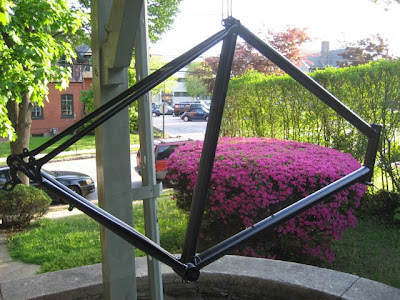


I am missing photos of the following steps. I bought some new parts. A crank and back tire. Then I flipped the handle bars and chopped them off, repositioning the brake. I only have a front brake now. Probably the hardest part was learning how to take apart and reconstruct the bottom bracket. I had to buy a few bike specific tools, but I needed them anyway. It was dirty job, but those are often the most fun. So here she is...


So there we are, my very first bike all built by myself. About 90% of the tutorial I recieved was from online videos. And the other 10% from a local bikeshop. There are still a few small parts I want to update, like the pedals. I also still need to get a true fixed gear cog on the back. Mine is still a freewheel. But those will come in time. As for now I can finally ride my own bike to work, not Martha's. (I have been borrowing hers for several weeks now). I took it out a few times already and nothing has fallen apart yet. So I think I did it right.

Bike tuff!

*Update 5/11/2008*

I recieved an email from someone who saw this post asking about more info of where I got the online tutorials. I thought I would post my reply in case anyone saw this and wanted to know...


This link is for a blog called Bob's Garage. The guy instructs you on how to take apart, clean, and put back together a fixie. He is a little bit on the corny side, but I found it really great. It's kind of like a This Old House for bikes. Only thing is there is no actual video, just still photos and him talking.
www.fixedgeargallery.com/index.html

That tutorial was a link off of www.fixedgeargallery.com which is pretty awesome and has links to all types of things fixed gear related.

And probably one of the best is www.bicycletutor.com these videos were really easy to understand and helped with alot of the technical stuff.

Of course there were a couple things I couldn't quite find a tutorial for, but nothing I couldn't figure out on my own after a couple minutes. Getting the bike apart was the first battle and I would recomend buying a chain splitter, crank remover, and an allen wrench set for bikes. I used those and couldn't have done the job without them. Also having large wrenches is a must. My local bike shop would have done it for me, but it would have cost money and taken a few days. Doing the work myself was the best part. I had to throw some money down on a new back wheel with a dual cog. I think thats what its called. I can have fixed on one side and a freewheel on the other. Then I can flip the back wheel when I want to switch. That cost about $100. But it was totally necessary and I plan on having it for a while. The cranks were only about $40. But if yours are already decent, you might be able to use the existing ones. I know Bob's garage shows you how to do that.

Oh yeah check out this website to see some awesome fixies...

www.frankencycle.com

-Colin